On all Windows operating systems you can open the recycle bin settings quite quickly to adjust it!The Recycle Bin stores deleted files until the maximum storage size is reached. When this happens, the Recycle Bin automatically deletes older files in the Recycle Bin to make room for the newer deleted files.
Contents: 1.) ... Recycle Bin settings under Windows, with screenshots!
|
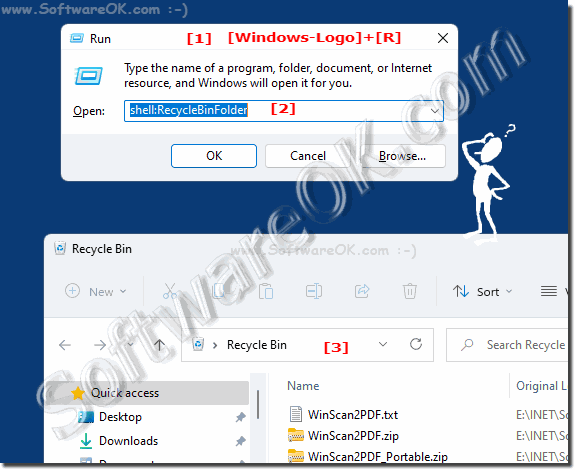
| (Image-1) Recycle bin settings all Windows! |
 |
Recycle bin settings!
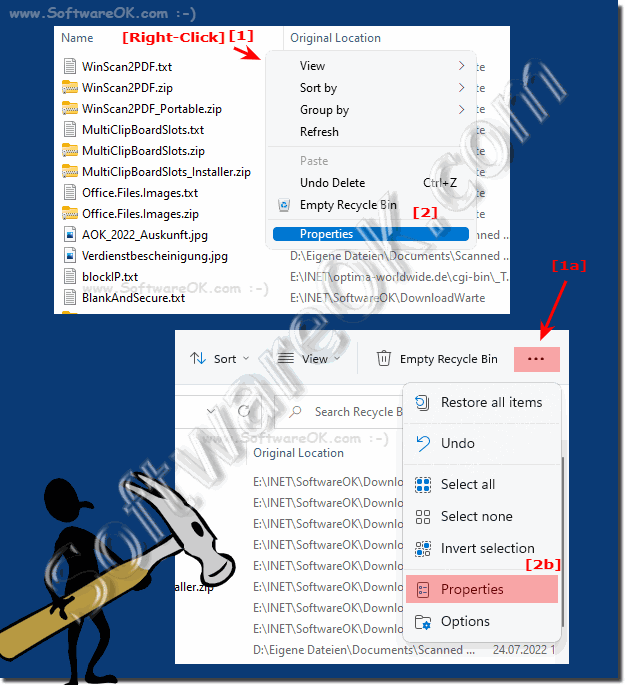
Right-click in an empty space and select Properties (... see Image-2 Point 1 and 2)
PS: In Windows 11 [...] Menu select Properties
| (Image-2) Open Recycle bin settings all Windows! |
 |
If you have multiple hard drives, partitions, or an external hard drive connected to your PC, each location has its own Recycle Bin folder (Recycle.Bin) and its own Recycle Bin settings. Removable drives such as USB flash drives and memory cards do not have a recycle bin. Files deleted from removable drives are permanently deleted.
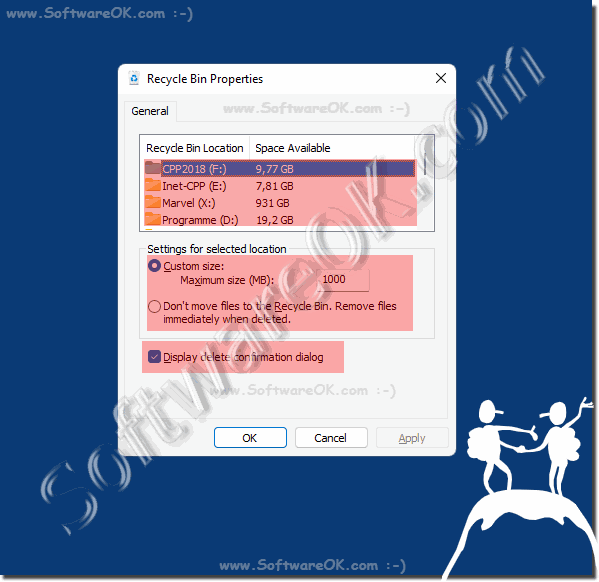
Now in the Recycle Bin properties, you can change the Recycle Bin behavior and options.
1. Select the Recycle Bin location for the drive for which you want to change the maximum storage size.
2. Select Custom Size , set the maximum size in MB for the desired location and click or tap Apply.
3. Specify whether the dialog to confirm the deletion or deletion should be displayed.
2. Select Custom Size , set the maximum size in MB for the desired location and click or tap Apply.
3. Specify whether the dialog to confirm the deletion or deletion should be displayed.
| (Image-3) The Recycle-Bin Settings on all MS Windows OS! |
 |
The recycle bin offers a virtual folder on the hard drive when deleting files or folders. If you delete one of these items from your hard drive, Windows moves it to the Recycle Bin and the Recycle Bin icon on the desktop changes.
See also: ►► Recycle bin for the Windows desktop
Like MAC-OS and Linux or Android, Windows also has a recycle bin, in this example, which is suitable for the following operating systems Windows 11, 10 Pro, Enterprise, Home, Windows 8.1, Windows 8, Windows-Server 2019, 2016, 2012, Windows 7 Basic, Professional, Starter, Ultimate, you can see how to change the behavior of the recycle bin.
2.) Recycle bin settings under Windows in text form!
1. Open the Recycle Bin dialog box by typing the command:
"shell:RecycleBinFolder" in the Start menu or search box and press Enter. This will open the Recycle Bin settings window.
2. Right-click an empty space in the window and select "Properties" from the context menu.
3. In the Recycle Bin properties, you can adjust various settings:
- Select the Recycle Bin location for the desired drive.
- Set a custom size for the Recycle Bin by entering the maximum size in MB and clicking Apply.
- Decide whether you want to display a confirmation window when deleting files.
The Recycle Bin serves as a virtual folder on your hard drive. When you delete files or folders from your computer, they are first moved to the Trash before being permanently deleted. You can also see the Recycle Bin icon on your desktop, which changes as the contents of the Recycle Bin change.
Similar to other operating systems such as macOS, Linux or Android, Windows also offers a Recycle Bin that allows you to customize the behavior of the Recycle Bin and adapt its settings to your needs.
3.) Common mistakes in the trash settings and how to avoid them!
Here are some common mistakes in Recycle Bin settings and how to avoid them:1. Not enough storage space:
A common mistake is not allocating enough space to the Recycle Bin, which can result in deleted files not being able to be saved properly. To avoid this, make sure you reserve enough space for the Recycle Bin, especially if you delete a lot of files.
2. Recycle Bin maximum size too large:
Another mistake is to assign too large a maximum size to the Recycle Bin, which can result in using up unnecessary space on your hard drive. It is advisable to adjust the maximum size of the Recycle Bin according to your actual needs to avoid wasting disk space.
3. Missing confirmation windows:
Disabling the confirmation window when deleting files may result in accidental data loss as deleted files are permanently removed without warning. To avoid this, enable the confirmation window to ensure you receive a warning before files are permanently deleted.
4. Don't configure each drive separately:
If you have multiple drives connected to your computer, you may forget to adjust the Recycle Bin settings for each drive separately. Make sure to configure the settings for each Recycle Bin according to the storage requirements of each drive.
5. Not emptying the Recycle Bin regularly:
Failure to empty the Recycle Bin regularly can result in unnecessary deleted files remaining on your hard drive and taking up space. Make sure you empty the Trash regularly to free up space and optimize your system's performance.
FAQ 108: Updated on: 12 April 2024 08:23
